Thursday, May 3, 2012

Summer Project - deadf0x

Because I enjoy deamau5 music, but just a couple of his many songs are... let's just say, "OC inappropriate," I decided to blatantly copy parody some of his album covers using a fox instead of his mouse...this way it's kind of like saying I don't approve of everything about him; just enough to mess up his covers or something (I don't completely understand what I just typed either)

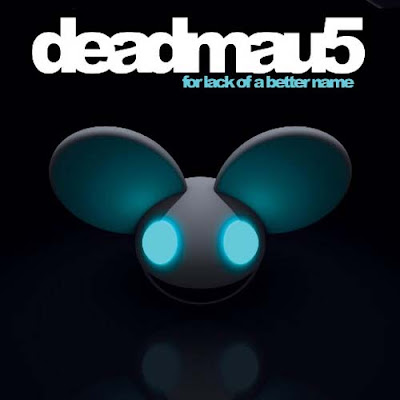
The first album cover, Random Album Title, looks like this:

Here is what I did in Maya- (the first image is an in-progress shot; the second one is the final render)
 
This is somewhere in the middle of my work, I wanted to change the camera angle and make the eyes more pop-out-ish - Also, I know the mouth is wrong but I could not figure out how to make the smile NOT stretch all the across the circle (I think the artist used a different program than me)


Here's the final render, completely done in Maya-


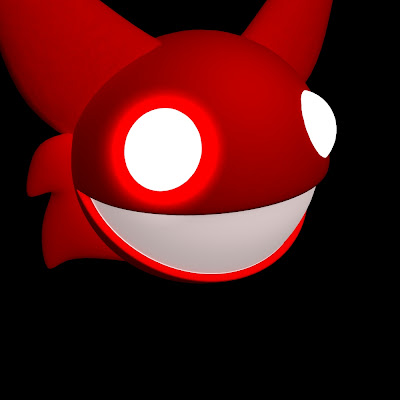
Here is the album cover finished in Photoshop - All I did in Photoshop was add text, darken the image a little bit, and add a little more pinkish highlight to its right eye- I wish I could have found the exact font for the subtitle, but I did the best I could (according to the original album cover the letters were supposed to be more spaced apart but I was also supposed to keep the subtitle the same horizontal length as the title)


After that I wanted to do his next album, for lack of a better name-
 

I was able to use the same model as the first cover I recreated, all I had to do was stretch out the eyes a little and move them closer together then change the material colors - The lights took a while to get right though- and it took me a minute to remember how to get shadows in there

Here is the light setup I ended up using - I was glad to use the knowledge I gained about Spotlights and Light-linking from Digital Tutors

 3 ambient lights, 3 spotlights, and 1 directional light - I made it so two of the ambient lights ONLY affected their corresponding ears, and the two spotlights shining on its eyes only affect the head-sphere

 The reflection, however, I could not do well in Maya; here are two tries-


This one I was simply trying to get a reflective surface - I used a Blinn and turned it black and upped the reflectivity settings 

This one was closer to the album cover but not yet what I wanted - I gave up after a while and decided just to add the reflection in Photoshop =P

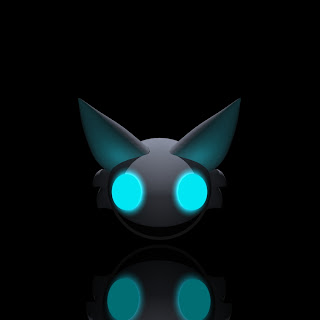
 Here's the final image - The only things I did in Photoshop were the text and the reflection (I simply duplicated the head, flipped it upside down and lowered its opacity)


These two covers took 1 day each to make (and when I say one day I mean sitting on my bed for at least 5-8 hours each) - I learned that even though the modeling was quite easy, the lighting took 95% of the time to fix - I am glad I learned about Lighting and how to use the Render View from Digital Tutors!

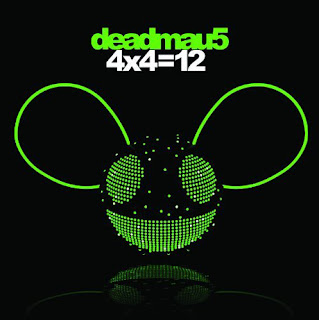
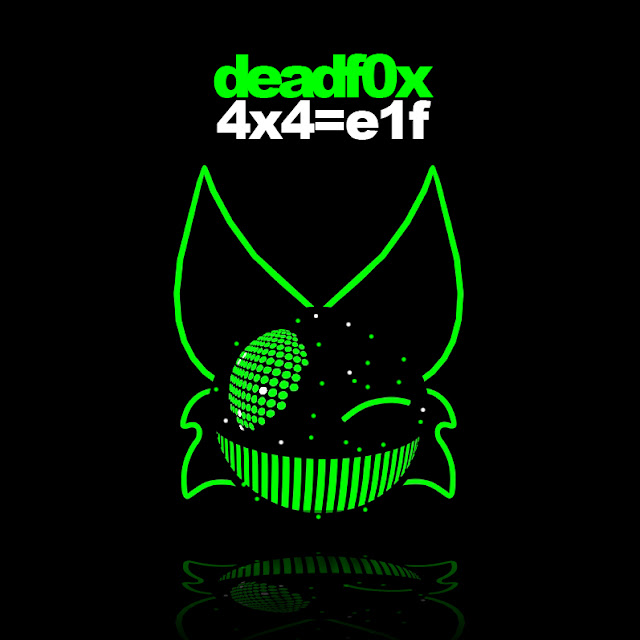
The next cover was difficult - I gave up trying to get the eyes and mouth right - Now I am curious as to what program the designers used to make 4x4=12

I ended up accidentally creating a cool texture for the teeth by tweaking a "bulge" texture- Also, I felt too lazy to try to get the other eye right that I made him wink instead - This model consists of a sphere and NURBS curves I converted into polygons then smoothed - This is the first model so far that I spent more time in Photoshop making than Maya because I spent a day trying to get one eye right trying various ways

All I needed was an ambient light for my lambert because the green surface shaders appeared in the render whether there was a light or not

Final render used:


Final Photoshopped image - (text and spots added)
(eh, elf almost rhymes with twelve)


And because I saw some of his single song-art different colors, I imitated it in Photoshop


And this has nothing to do with Maya, but I did do another cover just in Photoshop - It fits in with the subject of this post

Reference album - Meowingtons Hax tour trax-

 My rip off version that proves I still have a lot to learn about foreshortening
So, yeah...this project gave me experience in both Photoshop and Maya - Most of it having to do with lighting rather than modeling, which I didn't mind - Trying to imitate the lighting was challenging but fun

Saturday, April 28, 2012

Class Intermission!

Yes, I know this blog is for 3D modeling, not Photoshop, but now I have a chance to gripe about the length of time I spent in the maclab and its inability to let people go


If it makes no sense, it's because my brain is dead!!! (temporarily of course)

Tuesday, April 24, 2012

Finishing the Dragon 2

Before I start let me take the time to mention the numerous program crashes my friends have had on these computers...

I feel your frustration!!!

I got really lucky and landed a computer that barely anybody uses, so it actually did not crash when I tried to use it because it does not store multiple user's preferences on it

Therefore I am the exception rather than the rule that I completed the model mostly the way I wanted because the computer I used actually handled my dragon without crashing every time I select an object

By the way I used the mac side on that computer

Moral of story - Try picking a computer nobody uses and see if it works better (?) maybe?

Anyways...
Sorry about the huge progress jumps you are going to see here -
  
Back legs have been sculpted since the last update

I used a stencil that came with Mudbox to do the scales (you can see the frozen belly and spikes - he fell into a refrigerator for a couple of hours and when I took him out I had to defrost him)

Then I used stencils and PTEX paint layers to color it


 When I tried to PTEX the head it turned all blue and I could not see the color I was trying to add - All I did was press the "up" button and then it turned un-blue and worked again, so I have no idea what went on there

Here is the finished model - I do not know what to do with it, the background or anything, but at this point I do not really care much - I just want one or two hours of sleep and then to get up and study for my two Bible finals I have today


 Yes, I did model the tongue underneath there

Raaawr..

 I enjoy graffiti-ing on my models after I am done

 If I could do anything differently on this project, it would be to not build the wings out of curves - They were my ultimate modeling and texturing downfall - Also it is disproportionate so I would use an image plan to model on in Maya before I start

Also, I would have done more if I had more time, but I do not and also have little Mudbox experience, so I guess this is adequate for my first on-my-own model

UV-less painting is the savior of the world!!!

Verdict - I like Maya WAAAAAAAAAAY better for modeling - Mudbox is okay for texturing and coloring - that is if you have a super megacomputer that can handle objects with many polygons

Sunday, April 22, 2012

Finishing the Dragon 1

Here is the dragon at the beginning of the day -


Here is what I accomplished


I realized I had forgotten to bring in the wings

I am having some random trouble sculpting parts of the dragon - I really need to use the grab tool on his front claws to make them curve downward, but the grab tool will not work on the arms and I do not know why - maybe I can fix that with posing


Also because I built it from a curve I cannot separate its fingers without totally destroying its hand - So I will have to accept that its hands will not be completely accurate to the model


Wednesday, April 18, 2012

How to make a Derposaur

Yet another obstacle in the road to finishing my Lego dragon...Oh well, I had fun posing it!
The T-Rex tutorial! ...Or, as mine came out to be, a Durp-o-saur tutorial...  First, we created a basic mud-dino - Then we added some detail through sculpting


Between videos three and four, the tutor Justin added what he called a "little" detail - (ha, LIES) Basically in video 3 his T-rex looked like mine, the one on the right - Then, in video 4, the one on the left appeared and I was immediately humiliated - I am sorry; I just do not know the muscle structure of a 6,000 year old beast


 So, instead of carefully trying to follow his realistic approach, I decided to unleash a hideous being upon the world instead

 During the stencil-creating tutorial, which I had bad luck with on the dragonfly tutorial, I failed at making a good-looking spine texture and instead created a spikelike stamp - Since I went to the trouble of trying to copy his stamp, I went ahead and inserted it anyway:


Then Justin had me make this lovely displacement map!


...But not after a quick but harmless program crash!


After coloring it and adding elf ears and a goatee, I realized it kind of looked like a demon...


But that did not stop me from creating half a dozen disturbing poses with it!!!

Here is its skeletal structure


Now can I get back to my dragon? PLEEZ?

Also all my finals (including the dragon) are due on Tuesday so this weekend should prove interesting...

Sunday, April 15, 2012

Building Lego Dragons out of Mud

I attempted to re-render my "final" render from the last project before I turned it in:


I took away the clearly unrealistic fox from the scene and turned the light red - I also attempted moving the bike over to fill some of the empty space but it did not look very good - I also made the sky a little bluer and lightened up the street, which previously resembled an oil slick

Now on to the next project:

We picked out old toys to model - I took a dragon my history teacher gave me and will attempt to model it!


I modeled the base of my toy in Maya - It is a Lego-dragon (actually, it's Mega Bloks, but whatever...)


Here is how it looked in Maya (mostly built from curves then converted to Polygons)


Here is how it looks now, in Mudbox - I learned that you have to have all of the UVs in one square, with none overlapping one another before it can be moved correctly to Mudbox - Also, I kept wondering why it appeared in Mudbox super-blocky, and tried sending it over several times (frustrated), until Josh reminded me you have to subdivide it to smooth it (he he dur da dur I am an idiot)